
Add Your Heading Text Here
Refreshing your home décor can be as simple and affordable as hanging photos or artwork on the walls. This budget-friendly idea is not only easy to execute but also flexible, allowing you to switch things up whenever you feel like refreshing the vibe of your space. Whether you’re opting for a single, bold statement piece or curating a gallery wall of family photos, paintings, or prints, the possibilities are endless. The idea of arranging and hanging artwork can seem daunting, but with a bit of direction, it’s a task that anyone can master. Experimenting with different layouts before settling on one may lead to surprising and delightful results—the most striking arrangement could be the one you least expect.
Table of Contents
Where to Place a Gallery Wall in Your Home
Deciding where to install a gallery wall can be tricky. Experts often suggest showcasing art in spaces like dining rooms, hallways, or living areas where they will naturally draw attention. For example, a gallery wall in a dining room can instantly elevate the ambiance, making it a stylish focal point during meals. The key is to pick a location where your artwork complements the architecture and the furniture of the room.
Supplies You’ll Need
Like any home improvement task, you’ll want to gather the right tools for hanging your photos or artwork. Here’s a basic checklist of supplies you’ll need:
- Tape measure
- Hammer
- Carpenter’s level (preferably 24 inches long for accuracy)
- Picture hooks (two per frame for stability)
- D-rings (two per frame to keep the art level)
Hanging Pictures at Eye Level
While traditional advice suggests hanging artwork at eye level, it’s important to consider the context of the room and its architecture. You may want to deviate from this standard depending on the effect you’re aiming for. However, a good starting point is to learn how to hang pieces at eye level.
If you’re following the average eye-level guideline, the center of the picture should be 57 to 60 inches from the floor. To determine where to place the hooks:
- Divide the height of your frame by two.
- Subtract the distance between the top of the frame and the hanging hardware.
- Add this number to 57, 58, 59, or 60, depending on where within that range you’d like the artwork to land.
This final figure will give you the height from the floor where the hooks should be placed on the wall.
Securing the Art
When it’s time to hang the pictures, using two hooks is usually the best approach to prevent the frame from tilting or shifting. Here’s how to do it:
- Attach two D-rings to the back of the frame, ensuring they are aligned evenly on both sides.
- Once you’ve chosen your placement, mark the wall lightly with a pencil where each hook will go.
- Use a level to ensure the marks are aligned.
- Hammer the picture hooks into the wall at the marked spots.
- Finally, hang the picture by hooking the D-rings onto the hooks.
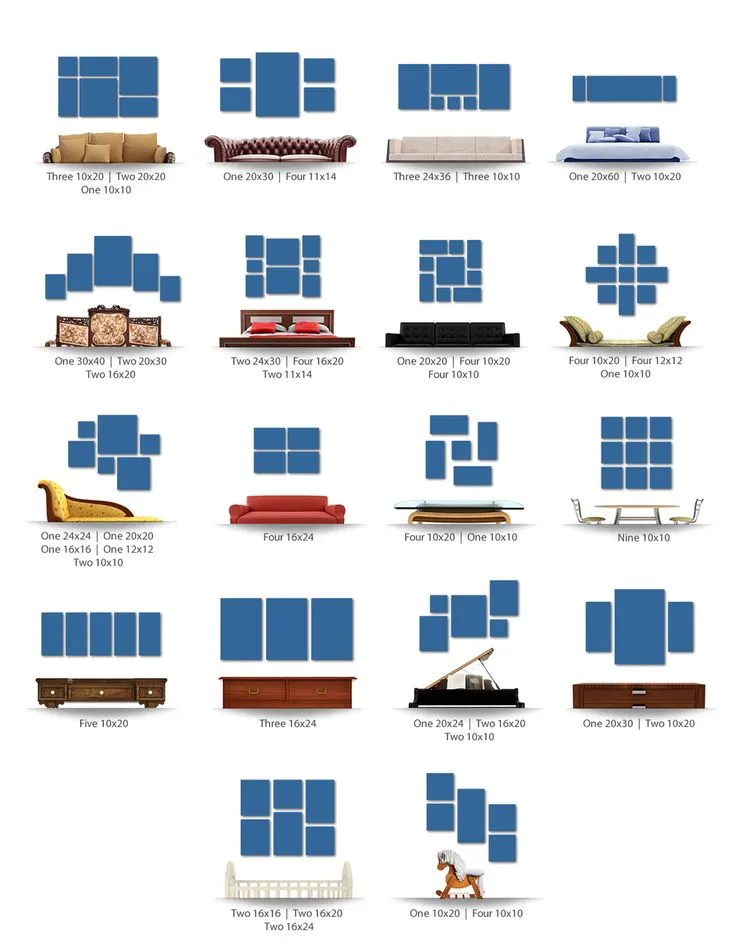
Arranging Pictures and Artwork
The way you arrange your frames can have just as much impact as the artwork itself. A well-ordered grid creates a polished, formal aesthetic, while a more free-form arrangement within a square or rectangle gives off a casual vibe. Regardless of whether you’re hanging multiple frames or just one, centering the artwork horizontally between two points often provides a balanced, harmonious look.
Plotting Out the Arrangement
Before hammering any nails into the wall, take some time to plot out your arrangement. Lay the pictures on the floor or lean them against the wall to experiment with different compositions. Have someone hold the frames up on the wall while you step back to get a sense of how they’ll look in the space.
If you’re working with a grouping of pictures, continue rearranging them until you find a layout that appeals to you. If your frames differ in size, it’s especially important to experiment until the configuration feels balanced. Masking tape can be helpful to prevent scratching the paint while testing placements.
Creating a Common Theme
In most art groupings, there is typically a common thread that connects the pieces. They might all be part of a collection, share a similar style, or have matching frames. Even if the pieces are varied, you can create cohesion by keeping one element consistent—such as the color of the mats or frames. However, in some instances, diversity in the artwork itself can be the theme, making for a more eclectic, informal grouping.
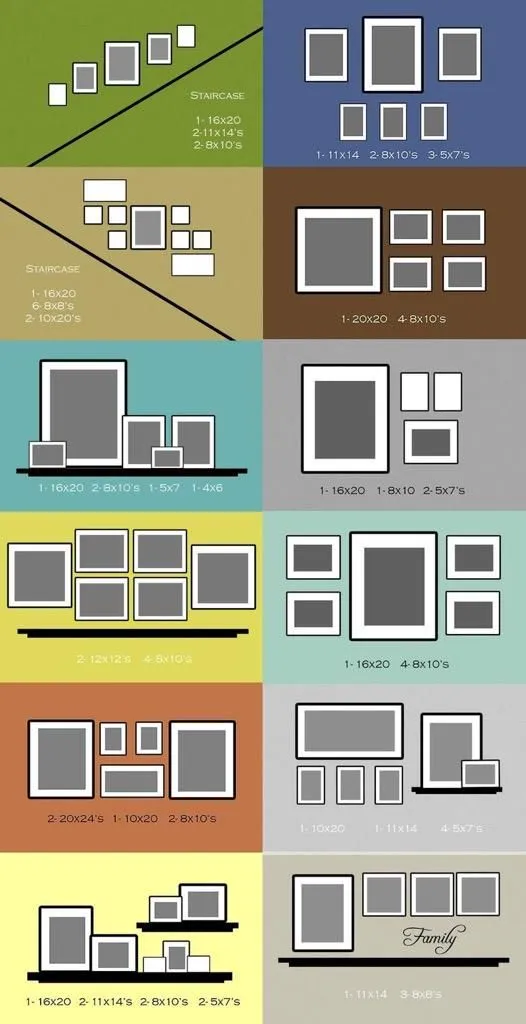
The placement of furniture in a room can provide useful guidance for your art arrangement. For example, lowering a set of pictures over a couch or armchair can create a more intimate, cozy feel. Similarly, placing a series of small pieces above a desk can offer visual inspiration as you work. When hanging a collection of photos near a chair rail, consider positioning them slightly above the rail to draw attention to the architectural feature.
Arranging Mismatched Frames
Hanging a group of mismatched frames can be challenging, but the results can add character and depth to a room. A mix of sketches, paintings, architectural drawings, and decorative pieces can be arranged in an informal, asymmetrical composition. Although the frames may vary in style, keeping a formal element—like similar colors or finishes—can prevent the arrangement from feeling too chaotic.
Securing the Art
Before committing to your final arrangement, lay everything out on the floor and test different configurations. Avoid creating large, empty “rivers” of space between the frames, and adjust the spacing until it feels balanced. When you’re satisfied, follow the hanging process to secure the artwork to the wall.
By following these tips, you’ll be well on your way to creating an eye-catching and personalized display in your home, making it uniquely yours.